So, the promised costume details.
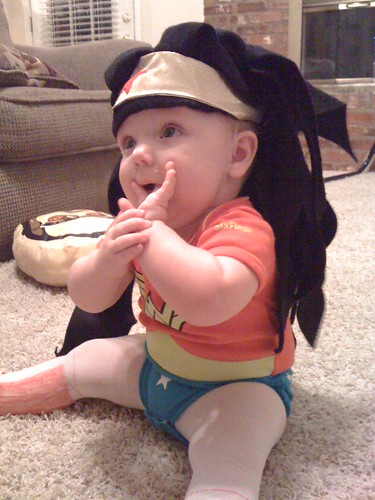
I literally whipped this all up in one day, so it’s really a no brainer. I did the tiara first. Wonder Woman’s tiara curves up on top and slightly so on the bottom. (I’m referencing the real Wonder Woman here, not the TV Wonder Woman.)
First step, obviously, is to measure your kid’s head. Laura’s was about 19-1/2 inches, but I figured the wig would take up some room so I went ahead and made my circumference 21 inches. I then drew a rectangle that was 2 inches by 10-1/2 inches. (A quick note here—I’m math-tarded, so if I could figure this out, really—you can too!)
I then measured up from the center one inch and made a mark. I did the same half an inch down. Out came the trusty French curves and I made a nice gradual curve on top and bottom.
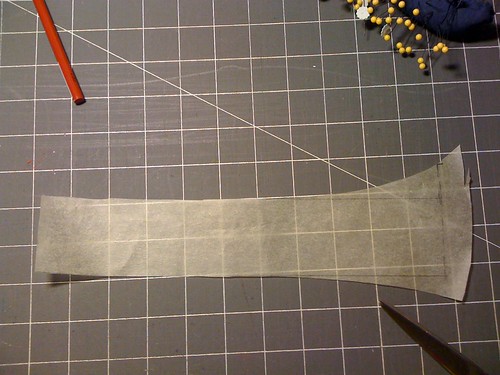
I folded my gold lame on the grain, lined up the pattern on the fold and cut out two pieces. Stitch around the edge (I used a 3/8 inch seam, but float your own boat—more or less to taste), leave a hole for turning, and then turn it.
I want to note here that I did not interface this. Actually, let me restate that: I did not interface the final iteration of this. I tried interfacing it with a really stiff interfacing I had hanging around, but had trouble turning the danged thing and ended up throwing that one away. Lame shreds, y’all! I decided against interfacing on the second go-around because it didn’t seem necessary and, quite frankly, I just didn’t want to do it. If I were making this to stand alone, I would definitely stiffen it up, but as it was going to be tacked onto a baby’s wig, I figured no one would care. Turns out, they didn’t. Score one for me. :)
So, anyway. If you’re industrious, slip stitch the hole closed. I’m lazy and knew that this was the only time she would likely be wearing it, so I got some Wonder Tape (appropriate, I think…) and tacked it closed. Seam finished.
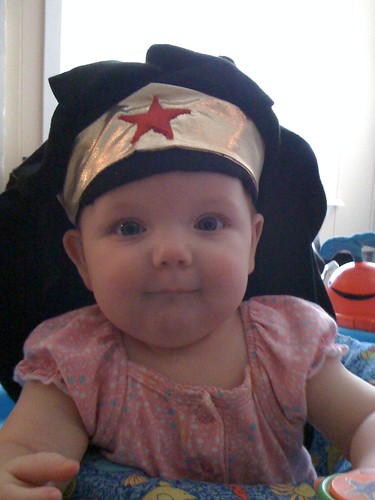
Next, I played measured the height of the tiara and figured that I would need about a 1-1/2 to 2 inch star. Okey-dokey. You could totally free hand this. You could also just find some big red star stickers. I, being the anal retentive freak I am (and the broker than broke chicka I am, since I spent so much money on tights and fabric markers) went to my old friend, Photoshop, and used the alignment bars to set up the size I wanted, embiggened the star to the right size (yeah, I know it’s a made up word…whatever…), and printed it out. Tacked it to the scrap of red sweatshirt material I happened to have laying out for another project. Snipped it out. Wonder Taped it in place. Zig zagged it on with a narrow stitch. Poof, done. Fabu.
The wig took about the same amount of time, but only because I had to do the tiara twice. So I guess, real world estimates, it took twice the time of the tiara. Whatever. Artist—not math teacher.
I have lost my pattern, but basically, I took her head measurement (bumping it up, again, to 21 inches), divided by four (since I was going to be making a skull cap type of hat with four pieces) and drew another rectangle, this time five inches (the height I was making the had from crown to edge) by 4-1/4 inches (head circumference divided by four). At the top of the rectangle, I marked out the center (2-1/8 inches) and drew a gentle curve from there down to each side, about an inch or so down. It ended up looking like an upside pointy-ish letter ‘U.’ Stitch two of the pieces together along the crown, and then stitch the other two together. Line up the two stitched together pieces with seams matching and stitch around the now-very-large-curve. This should make you a nice little skull cap.
I sewed mine out of black fleece. It was pretty stretchy, so along the two sides that I had designated the sides of the head, I got a little bit of clear elastic and gathered it a bit. I didn’t want it smooshed up too much, but I did want it to grab a bit.
Then came the fun part: I laid out my black fleece and started cutting out some long swoopy shapes. They were kind of like long, pointy 8s. I kind of just used my rotary cutter and let it do its thing. No one is going to be inspecting this thing up close and personal (and if they do—good grief—it’s cartoon hair! Get over it!), so they don’t have to be perfectly symmetrical or anything. Just long and swooshy.
Once I had about 20 or so hair pieces, I started sewing them to the cap. I started doing this on the machine, but really, it was much easier to just tack in them in place by hand, which I started doing about half way through. The key here in hair placement is that you want to stitch it upside down from where it’s going to be so that the point of the ‘8’ will fold under the hair. I didn’t do that on my first layer of hair and so I had all these little triangles sticking up. I ended up covering them pretty well in the end with subsequent layers, but it was kind of frustrating at first. Whatever. Live and learn.
Which leads me to the other important thing about the wig—start at the bottom of the head and work your way up. I started with the back and sides, got a layer or two in and then went in and tacked the tiara into place. I machine stitched it in center back and hand tacked it (with red) on the star. Then I added more hair, going all the way up to the edge of the tiara to make the waves.
I think, overall, the effect was pretty darned nice, if I do say so.
My last step was to sew a clear elastic chin strap to keep it in place. I totally expected my little fireball to be ripping at the wig, trying desperately to get it off, but she was surprisingly cool about it. She fooled with it at first, but once I showed it to her in the mirror, she laughed and stopped messing with it. I put it on her a few times while sitting around the house so I could take pictures and would take it off when she got frustrated with it. Then, when we went out trick-or-treating, I put it on her and she didn’t mess with it at all.
The tights were super easy, as well. I got some plain white baby tights (do you have any idea how hard it is to find baby tights sans ruffles? That was the hard part!) and put them on her to figure measurements. I used a pencil to mark her knees front and back, as well as the soles of her feet. I pulled them off her, put some cardboard in to give shape and to block paint seepage and started coloring them with a red fabric marker. I left a white stripe down the front and after I colored in the sides and backs, I went around the top about half an inch up from the top with just a thin line, to indicate the white stripe at the top of Wonder Woman’s boots. Super cute, super easy and Laura loved looking at them and playing with them. (Amazingly, she didn’t try to eat them.)
So that’s it. Wonder Baby on the cheap and easy!
Hope you all had a great Halloween!
BTW, if any of this doesn’t make sense and you’re desperate for clearer instructions, leave some comments or email me or something and I’ll be happy to try to work this all out in Photoshop or Paint or something. I’m lazy, though, so I figured I’d go the minimal route tonight… :)
No comments:
Post a Comment