So, it's been a while since I've sewn and thusly it's been even longer since I've posted on this blog. I have to admit, this particular post is kind of selfish because I'm hoping (fingers crossed!!!) that I win the drawing at the Ottobre Design blog, but I really do want to share with my sewing friends, as well, the nifty-cool-neato wrap that Ottobre has included in the newest issue.
If you were around in the '80s, you might remember this collection of garment pieces--pants, a shirt, a skirt, and this tube thingy--that were all kind of interchangeable. Really, only the tube was interchangeable, but it gave the outfits so many different options--you could wear it around your waist/hips, you could scrunch it and....
....
Honestly, upon actually thinking about it, I can't really remember any more of the combinations that this outfit getup had. But I know there were more options.
I guess the point is, I never had that collection and I wanted it more than I wanted some Z. Cavaricci jeans (which was a whole heck of a lot). Alas, none of these fancy-pants things were sold at the K-Mart and Goodwill stores we shopped at. None of my older cousins wore them, either, so I couldn't count on them for hand-me-downs. It sucked being a poor kid...
.....
So, now that we all feel awkward, let me just redirect this bird to the point I was trying to make. I happened to be thinking about that garment collection the other day in my 'Man, that was a really cool concept and I wish I could have afforded those (probably not really that expensive, in retrospect, but not super-cheap, either) clothes.
Lo and behold, I saw the newest issue of Ottobre online very soon thereafter--probably the next day--and they had this....tubey thing....that reminded me so much of that outfit I desperately coveted.
So the cool part is, now I'm an adult and I can sew. When I get this pattern (and the other awesome stuff that comes in that magazine--great patterns this time!), I can sew it up, probably to a higher standard of quality than was available in the mid-'80s and certainly for a pretty penny cheaper. I'm pretty giddy with the possibilities.
In case you're wondering which of the nine alternative ways I'm going to try first, I'm favoring numbers two and four, although I really kind of dig number one, as well. I'll probably hack the pattern as well to try to make my dream '80s outfit.
It's going to be a fun sewing month! :)
Friday, August 27, 2010
Sunday, February 7, 2010
Sewing Buddy!!!
I started teaching the boy to sew today.
(Yeah, I know. I had to do something to counteract all the broiling testosterone in the WORLD right now! I mean, even the guy at the bookstore, as I was checking out, asked me, pseudo-casually, who I thought would win ‘the game.’ I replied that I didn’t particularly care who won—I was just in it for the commercials [which sucked this year—can I get an amen?!?]. Turns out there’s a thing at the end of the receipt on which you indicate who you think will win. If you are right and you bring your receipt back in next week, you get a discount. I can’t escape the crap!)
Anyway, I decided that at five, Harrison’s old enough to start sewing if he wants to. He’s always watching while I work on things for him and Laura and is always asking if he can help, so I figured now was as good a time to start as any other.
I started by setting my machine up with a medium sized needle and no thread. My Babylock has a speed control on it, so I set it to the lowest speed. I then brought him over to the machine and took the foot off so he could see the feed dogs. I demonstrated that when you press the pedal, the dogs move up and back, feeding the fabric along. I then showed him the different feet I have for my machine and helped him put the one we would be using—the standard zig-zag foot that has notches showing dead center on the needle, as well as 1/8” in either direction.
We then got a sheet of paper—I’ve got a ream of newsprint that I bought years ago when I thought I wanted to do paper piecing because it’s thin and tears away from the fabric easily. I never did much of the piecing, but I’ve had the paper around all these years; printing on it for general use is pretty awful because of its flimsiness. I drew some straight lines on the page and sat down at the machine, showing him how to line up the middle notch with the drawn line. I sewed a few inches, showing him how to keep the line centered and then I moved out of the way and let him do his thing. I had to get my nursing stool and put under the foot pedal for him—he’s pretty short—but once that adjustment was made, he did great.
After he did four straight lines, I drew some boxes to teach him some pivots. Again, I demonstrated on one corner and then let him take the reins. Again, he picked it up pretty quickly and did a spectacular job. Only when I moved on to curves did he get frustrated—he kept moving off the pencil line and would have to redirect himself.
I think we’re going to hold off on doing much more curving for now, though, and focus on the straight stuff. He’s a big Indiana Jones fan, so I’m thinking we’re going to rig up a messenger-style bag for him to add to his already existing Indy dress-up gear. I’ve already got the fabric picked out and am turning ideas around in my head. He should be able to take a couple of rectangles, fold them right sides together and sew along the sides and then attach them at the top. Throw in a strap and a flap and it will be complete. I think we’ll even do a button on it so he can use my one-step button-holer.
I think he’d also be able to handle some shorts or simple pull-on pants pretty soon, too, as long as I do most of the cutting and pinning. The seams are all straight so he should be able to do it.
Good stuff coming down the pipe! I’m excited to have a new sewing buddy!
Sunday, January 24, 2010
Reversible Hoodie
Yet another review, this time for my son’s reversible hoodie. My poor friends who regularly check out my “regular” blog must thing that all I do these days is sew. I’ve been quite busy with sewing lately, though, and it seems that I never get a chance to stop and document stuff. But to that end, I’ve got stuff that I’ve sewn over the past few years that never got uploaded. I’m looking at forking out the $25 for an upgraded membership over at Flickr because my photo bank has run waaaaay over the 200 limit they set for the freebie account. Will have to do that when I get some money, though, so it’ll be a while. In the meantime, I’m hoping to get images and reviews uploaded to Pattern Review before they disappear into the nether regions of Flickr.
Friday, January 22, 2010
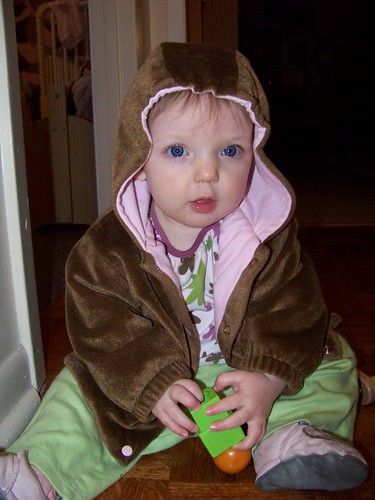
It’s Bear-able
As promised, another review, this time for the bear jacket. Now off to enjoy some Lonesome Dove with my honey!
Thursday, January 21, 2010
Ta-Da!
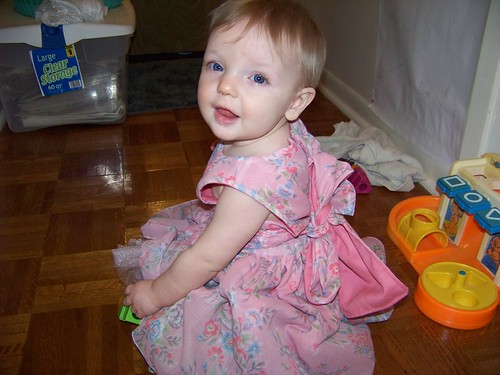
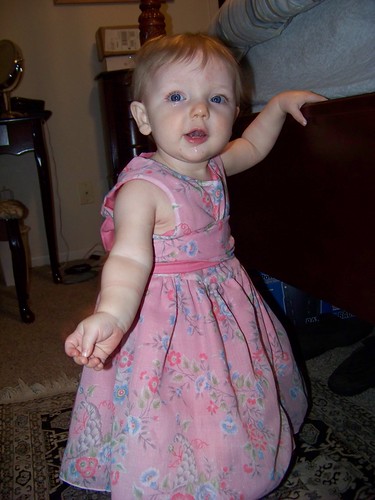
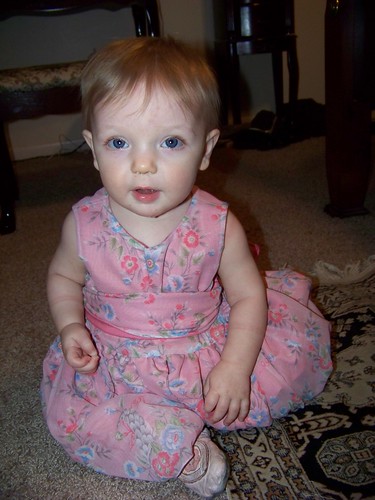
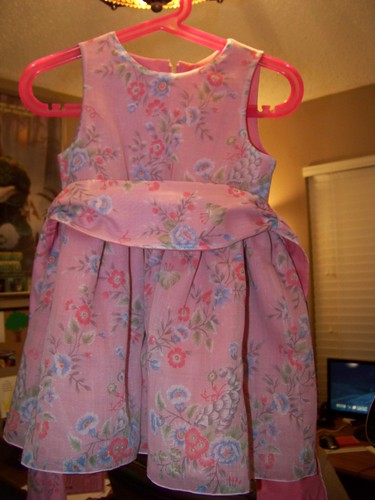
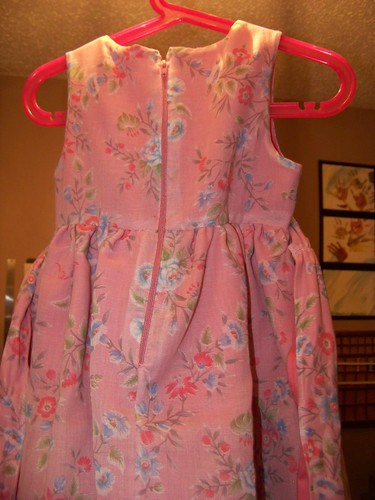
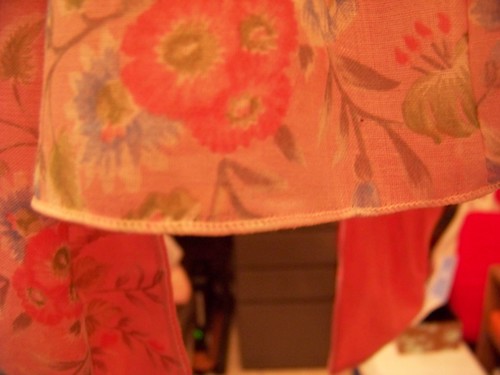
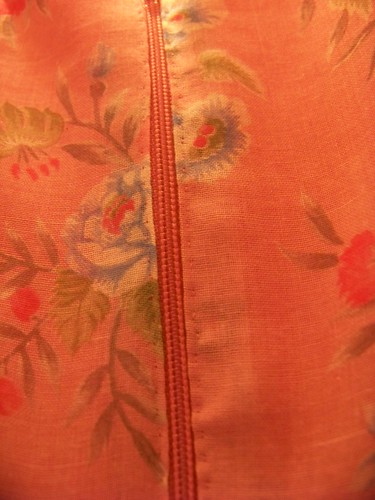
Ok, I’m going to cop out and post a link to my review for the New Look dress since I spent so much time typing it over at Pattern Review and I’m too lazy to cut and paste and remove all the tags over here. Which strikes me funny, since I know that anyone reading my regular blog got here by a link, too. So, Harrison and Laura Files readers, sorry about the multiple jumps here, but I’ll throw in a few pictures here to make the extra jumps sting less. :)
I am aware, btw, that her dress is a little big. Her birthday is in about six weeks so I anticipate that it will probably fit just about perfectly at that point. Honestly, though, I’m just so excited that I have it done this early, I wouldn’t care if it were two sizes too big.
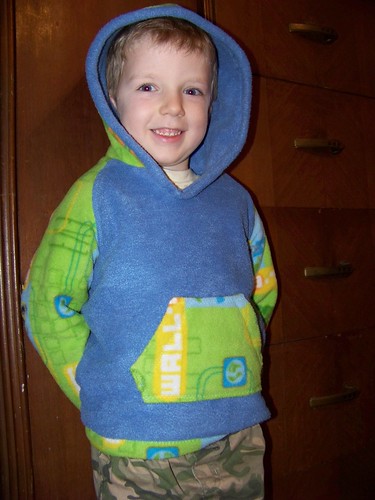
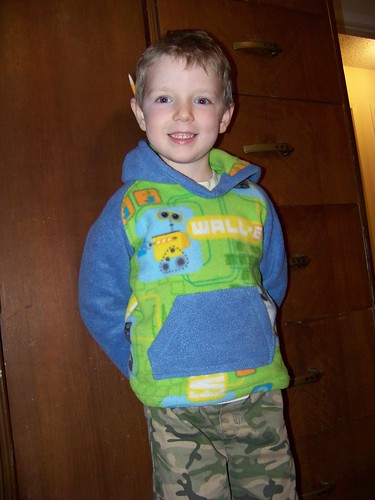
I’m also posting pictures of the kids in their respective jackets that I’ve made in the past month or so. I so suck at documenting anything like this. Sigh. I’ll have reviews up for them at PR pretty soon, too, hopefully. Perhaps that’s what my posts will be for the next few nights? Maybe? Unless something cool happens around here, that’s sounding like a pretty good plan. I mean, we’re planning on watching the Space Station fly over us the next few nights, but otherwise it’s a quiet weekend planned at our Nut House.
So, without further ado, the cuteness:

Monday, January 4, 2010
Painless Ruffles
Feeling muchly geniusish tonight. I know I must have read this tip for taming gathers somewhere before—I’m pretty certain it didn’t just appear in my head, but even just remembering it and utilizing it is pretty darned smart.
So the problem with gathering, as anyone who sews can tell you, is that you go to all the trouble to get the gathers all nice and even, spreading them equally around the garment (in this case, a dress!), and when you go to do the actual stitching on them to anchor them in place they wiggle and woggle around on you. You end up with a skirt that is really poofy on one side and somewhat flat on the other.
Kind of takes the fun out of making a big poofy, twirly skirt.
What happens (for me, anyway) is that when you feed the gathers through the sewing machine, the flat part is usually to the bottom with the feed dogs and the bumpy part is against the sewing foot. The foot presses down because that’s what feet do, and it tends to squash the gathers out of its way. At this point, I usually stop, grumble, re-configure the remaining gathering and start sewing again, hoping for the best. Which of course, never occurs.
So I got to thinking tonight while working on the ruffle gathering for the dress I’m making for Laura that I needed some way to make the gathered part as smooth as the ungathered part.
And that’s when inspiration struck.
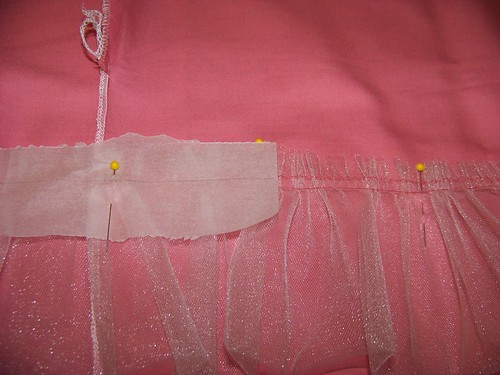
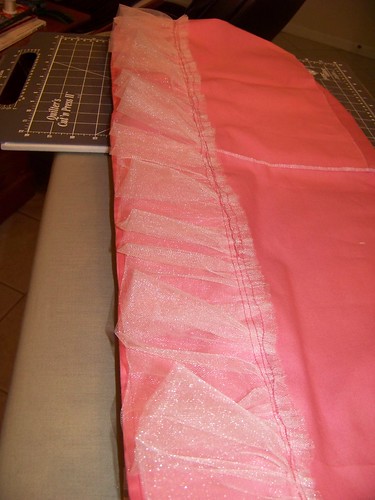
I began by gathering the tulle for the underskirt in the way I would gather most anything—two lines of stitching, about 1/8th of an inch apart and pulling the threads until it was the right size. I evenly distributed the gathers and pinned them into place on the underskirt along a line I had marked.
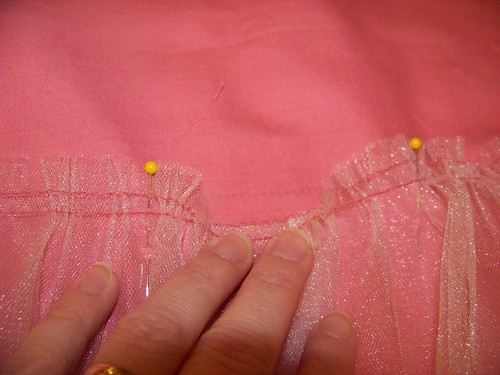
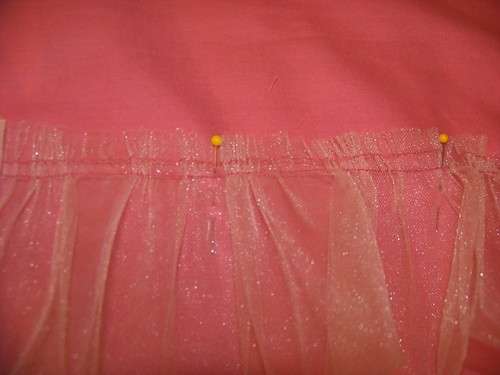
I next took some tracing paper and cut it into evenish strips of about 13 inches (the width of the paper) by two inches (my cut size). I then centered the paper up over the stitching lines and started pinning it in place. After I got the first strip in place, I lined up my ruler with the stitching line on both sides of the paper and then drew the stitching line onto the strip. Each subsequent strip would be overlapped about an inch or two and I’d line the ruler up with the drawn line to the left and the stitching line to the right.
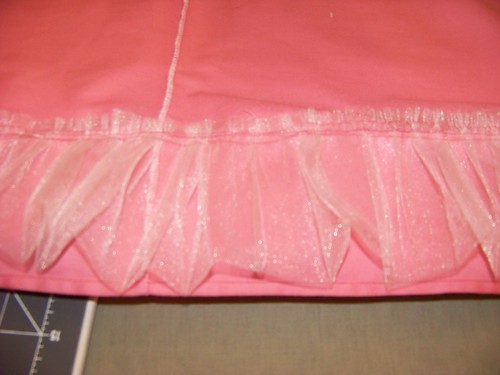
After the entire row of gathering was papered, I lined up my needle to sew directly on the drawn line.
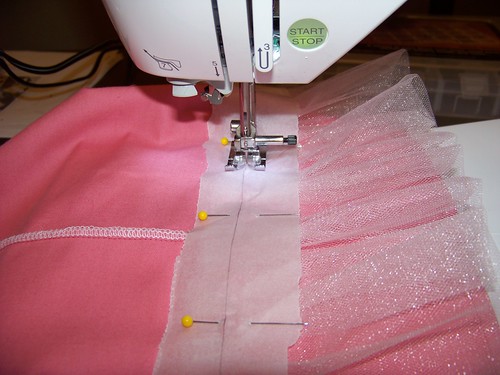
I sewed the drawn line and for good measure, I moved about 1/8 inch toward the edge and sewed a second line.
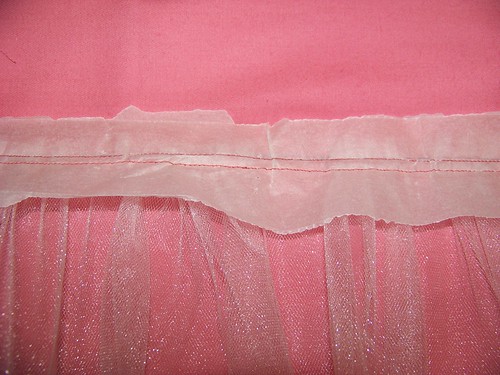
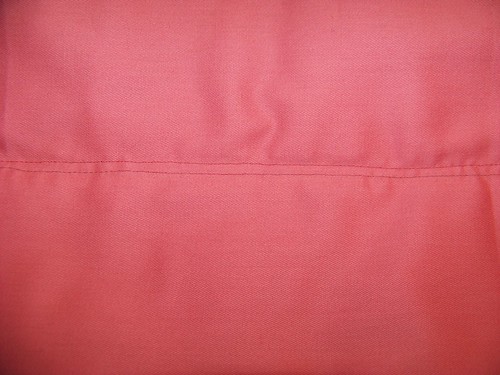
My last step was to carefully remove the strips of paper from the stitching lines. I had used a fairly close stitch length and some pretty flimsy paper, but if either of those factors had been different, I could have easily squirted or blotted a little water along the thread which would have weakened it enough to come off without any ripping problems. As it was, it came out really nicely and didn’t take too long to remove. My end product was a really nice ruffle that is evenly gathered.
Twirl time!
All told, this probably added about 20-30 minutes to the project, but the benefits of doing it add immeasurably to my happiness! I’ll be using this again when I attach the skirt to the bodice and pretty much anywhere else I think of adding ruffles!
Subscribe to:
Comments (Atom)